Sunday, February 27, 2011

Matchbox & Matching Card Set

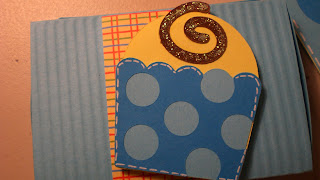
Hey!! I just wanted to share with you a matchbox set that I made from Tags, Bags, Boxes and More. I made it with my gypsy because I wanted to make it a specific size to hold a gift card. I decorated the tops of them with different cuts from the Sweet Treats cartridge.

I cut the matching cards from Sweet Treats. I used the cards feature to make them a shape card.

I'm still having a hard time finding a sharing website that won't charge me to give my followers free access to my gypsy or Design Studio files. But if you'd like this one, feel free to email me.


I made two sets of these. The matchbox itself was from Tags, Bags, Boxes and More. Page 123 & 124 makes the matchboxes.

After I cut the cover on page 123 I ran it through my cuttlebug. I added decorations that matched the card that goes with it. Just a few stickles and faux stitching completes the box!


Thanks for looking!!

Happy crafting!

Thursday, February 24, 2011

Gun Range LO

Hey everyone! I just wanted to share a quick layout with you.. If you are like me, I really struggle with layouts that are boy specific! This one was an all boy event... shooting at a gun range! Frankly I'm just thrilled someone took pictures for me! That in itself was a miracle!

Here is my LO displaying their trip to the gun range.

The targets are from Indy Art. The words "Ready, Aim, Fire" are from Doodletype.


Thanks for stopping by!

Happy crafting!!

-Jessica

Tuesday, February 22, 2011

Family Game Night

Here is a 12x12 LO I've done to showcase a Family Game Night. I totally scraplifted this LO from Queen of Paper at the Scrapbook.com's Gallery.

I love looking at scrapbook.com and searching their gallery for LO ideas.


I placed my pictures inside the border I used for the page. I chose where I wanted each picture to go and then I placed a sheet of vellum over the LO to draw the road for the gameboard. I traced the finished "road" on top of black card stock and then cut it out.


I used my pile of scraps to place small squares on the "road".

I cuttlebuged the green solid piece of paper with the Swiss Dots embossing folder.


To add some easy embellishment, I used a Blue Viva Decor Pearl Pen. I was my first time to use this on a layout for such a large area, that is why the dots are a little uneven.


As always, thanks for stopping by!

Happy crafting!

Saturday, February 19, 2011

Cinnamon Roll LO

I really enjoyed making this layout. For Christmas this year my dad made the most WONDERFUL cinnamon rolls in the world!!! It may seem silly to make a LO based on cinnamon rolls... but they are a new (and forced) family tradition. My dad is a fireman and one of his fire buddies gave him a recipe for these cinnamon rolls and he tried them out for us. Once we all took a bite - we demanded them as a family tradition. They are quite labor intensive so I wanted to make sure I scrapbooked them to document their goodness. =)

I don't have a close-up of the letters, but I cut them from chipboard and covered them in paper. On top of the paper I covered them in alternating colors of Studio G glitter that I got from Michael's in the $1 bin.


I got the drippy goo from a Cricut messageboard member who kindly shared her file. I'm sorry I cant give the credit to the exact person because I can't find it right now. But if you'd like to have the .cut file I can share. She sent me a short and long drippy goo file.

I used the drippy goo cut to mimick the glaze on the cinnamon rolls. I thought about covering them with accent essentials to give it a glaze, but that would be an awful lot of accent essentials.


For the cinnamon roll border I used George and Basic Shapes to weld together circles to make a 12" border. I inked the edges of the border with a dark brown color box ink pad to make it look like the burnt or darkened part of a cinnamon roll.

Inside the circles I cut this little swirl from Sweet Treats with white cardstock. I placed them in alternating patterns. I covered the white part of the glaze with accent essentials to give it a more realistic look.


Thanks so much for stopping by!

Happy crafting!

Friday, February 18, 2011

Birthday Card

Here is a quick card I've put together for a birthday. Its pretty quick and easy to make!


I have mentioned this before in another post - but I'm loving the Studio G card and envelope sets from Michael's. But I love them mostly because they are only $1. :)


I used the Sweet Treats Cricut Cartridge to cut the piece of cake on the card. I don't remember the exact size of the cut but I believe its around 1 1/4" or 1 1/2". Before I adhered the piece of cake I cut out a dark blue mat to put behind the hole in the card. I think it helps make the piece of cake "pop".


I ran the front of the card through my Cuttlebug using the Happy Birthday embossing folder.


I also ran a white color box ink pad over the raise portion of the embossed image to give it a more highlighted look.


Thanks for looking!!

Happy crafting!

Tuesday, February 15, 2011

Snow Day LO

Hi everyone! I hope you had a wonderful Valentine's day yesterday! I've been trying to stay afloat on my scrapbook pages and thought I'd share one I've finished recently.

In light of the crazy snow we've had here this past week... I thought I'd post a snow day LO I've done.

This is a 12x12 LO I've done using Winter Woodlands and Snow Friend Cricut Cartridges.


"Snow Day" was from Winter Woodland. I believe it was cut at 4". I embellished it by adding small gems with matching colors.


The cute little snowman was cut from Snow Friends at 3" - when you layer the hat on it gets to the height of about 4 1/2" or 5". These little suckers are hard to piece together. But I like the way they look in the end!

Something that was new to me on this LO was adding the border of gems. I ran my ATG gun down the line where the two patterened papers met and I placed the purple gems in a line down the page. This was a cheaper alternative than buying the pre-made gems accent pieces.


For the border I used a Martha Stewart Punch Around the Page Snowflake Edge punch. I also used it on the edge of the tag I journaled on.

Well here's my layout!! Thanks so much for stopping by!

Happy crafting!

Saturday, February 12, 2011

Wool You Be Mine? Valentine Card

Hey everyone! I thought I'd share with you a quick little Valentines card I made for a family member! My inspiration came from P-Kay Sunshine Creations as she was mentioned on the Cricut Chirp this week! I saw these cards and had to make one for myself.


I know I've already posted about this... but I'll say it again... I love the Studio G $1 card and envelope sets from Michael's! This specific set worked great because it was pink and it was cut like a gate card! I love it!


The top heart border was cut from a Recollections border punch I bought on sale at Michael's. I really like this one because on the bottom of it there is a little cover that catches your scraps that fall while you cut. It keeps your workspace a little cleaner, which is always a plus for me!


I layered a piece of patterned paper just below the border punch.

The lamb is cut from Create A Critter and she is complete with Stickles on her bows! =)


The sentiment (as scrap-lifted by P-Kay Sunshine's blog) is computer generated.


Thanks for stopping by!!

Happy crafting!!

-Jessica

Thursday, February 10, 2011

Merry LO

I thought I'd share one more Christmas time LO I've completed. This was a quick LO.

The embellishments are from a pack I got at my local HL. It made this LO a snap.

I printed this collage from snapfish.com and put my favorite Christmas pictures in it. I cut the collage on a straight line and added the {merry} sentiment.


The letters for "Merry" were made from green thickers that I added green stickles to. The red stripe was sent through my cuttlebug with a Fiskars embossing plate.


Thats it! Super easy and simple!!


Thanks so much for looking!

Happy crafting!

-Jessica

Gingerbread House LO

Just just thought I'd share a LO with you. Just before Christmas we decorated a gingerbread house.


The words "gingerbread" are cut from the Simply Sweet cartridge. I cut them in chipboard to give the letters some dimension. I cut them again in black paper and covered that in black glitter.


The gingerbread are cut from the Paper Doll Dress Up cartridge. I covered them in flocking and added stickles to define the cuts on them.


The border is cut from the Martha Stewart punch around the page.


Thanks for looking!!

Happy crafting!

-Jessica

Tuesday, February 8, 2011

Happy Birthday Card

Here is a quick birthday card I made for my mom.

This is made from the Sweet Treats Cricut cartridge.

To give the cake more "umph" I covered it in stickles! I probably should have covered it in adhesive and glitter instead of the wet stickles because it warped the cake in places. But it still gave the effect I wanted!


For the patterned paper I used the Cricut Celebrations paper pack. I've used it on many birthday cards, I love it!


I set the cake up on pop dots!


Thanks for stopping by!

Happy crafting!

Saturday, February 5, 2011

Get Whale Soon Card

Hey everyone! I just wanted to share a quick card with you.

My DH's grandma has been feeling under the weather lately and I thought I'd send her a card to cheer her up.

The whale was from the Create-A-Critter Cricut cartridge.


Something I have become very fond of is the Studio G cards with matching envelopes. I get them at my local M's in the $1 bin. They come in lots of colors and styles. I like these better than using regular card stock as the base of a card for a couple of reasons, 1.) it lets me have more "sturdy" writing capabilities and 2.) I don't have to worry about putting an insert for writing notes in a card with a dark base. Even if I have a card with a color I'm not crazy about, I can cover it completely with my own card stock to hide it. They are very versatile! -And did I mention they are only $1??!! :)


I used the bow from the porcupine on the whale. Gotta love her!! :) Oh and don't forget the stickles!!


Because I don't have super good white ink pads, I used wet embossing on this My Pink Stamper stamp. For this I used a Versa Mark Ink Pad, White Embossing powder and my heat gun.


Thanks for taking the time to check this out!

As always, happy crafting!!