Saturday, May 29, 2010

Sushi Scrapbook Layout

Hello everyone!! I thought I would take a few moments to share with you something I came up with for a scrapbooking layout. My hubby and I have a small weakness for sushi (when we can afford it!) and I wanted to do a layout explaining it. Enjoy!


My inspiration came from a page done here and wanted to incorporate my own version of a bamboo mat. The bamboo mat I used was actually a place mat that I got from my local Dollar Tree and cut it down to size.

The chopsticks were a cut from Design Studio using George and Basic Shapes. I took the rounded triangle and stretched it and made it skinny. There is a .cut file for you on the top left hand side of my blog.

The fortune cookie is kinda sad I know, but it was the best I could do. Through researching how to make a fortune cookie, I learned how to make super cute 3D ones! Here is that link. I basically did the same steps as shown at the website, but I made my circle at only 3 1/2 inches. I pretty much just flattened out my fortune cookie until I was pleased with it.

Please let me know what you think and feel free to use my .cut file!!!

As always, happy crafting!!!

Sunday, May 16, 2010

Baby Bottle Card

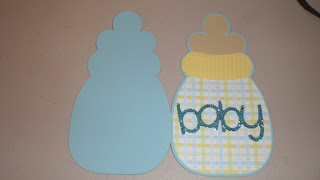
I am always happy to make someone a card, especially for the arrival of a new baby! My husbands cousin had a baby Saturday afternoon so I worked last night on putting together a card for them! This was a my first attempt at doing a shape card and I was pleasantly surprised at how easy it was. This shape card was particularly easy because I just welded two shadowed bottles together. I did not have to worry with flipping an image as I think I would have needed to do with other cuts. I am very happy with how it came out.
Everything for the bottle was cut from New Arrival, the words "baby" are from Simply Sweet, and the envelope is from Wild Card.
Check the top left hand side of my blog for the .cut file. Feel free to email me with any questions!


I added the lines on the neck of the bottle by using my cuttlebug and the Fiskars plate called "Lines"

This was my first attempt at adding glitter to a title. I put the words "baby" in my Xyron upside down and added glitter to the adhesive. The adhesive was a little "splotchy" in places so I had to add some Zig 2-way glue in places where the adhesive didnt take. I think next time I will try to find another adhesive that will be a little easier on me. Any suggestions are always welcome!
Here is a view of the card opened up. I added a liner on the inside of the card to add a personal message.


I tried to add an envelope that the card would fit into, and it is on my .cut file, but it is a little too big for a 12x12 mat. If you use the .cut file and have a 12x24 mat, the full cut of the envelope will work just fine. I do not think too much of the envelope was cut off because it still closed and held the card just fine.

Thanks for looking and please be sure to leave a comment!
Happy crafting!

Graduation Cards

Here is a project that I did with my mom this weekend. She asked me if I could make her a few graduation cards to give out to some seniors at our church. Of course I was happy to help! I used Wild Card, Simply Sweet and Locker Talk for the cuts. Check out the link on the top left of my blog to get the .cut files to use for this project.
Thanks for looking and dont forget to leave a comment!


I used pop dots (that I cut smaller) to use to raise the graduation cap. It gave it great dimension. I also used a little bit of stickles to add some bling to the caps, even though the picture doesnt do its justice.
I added this pic to show that a check fits perfectly in the card. I checked, and cash will fit just as well. I used the "cheater method" as I learned from My Pink Stamper on the ribbon, which is the part you see here. But when the card it closed you wont see that anyways.
Thanks for looking! Have a great day!!!